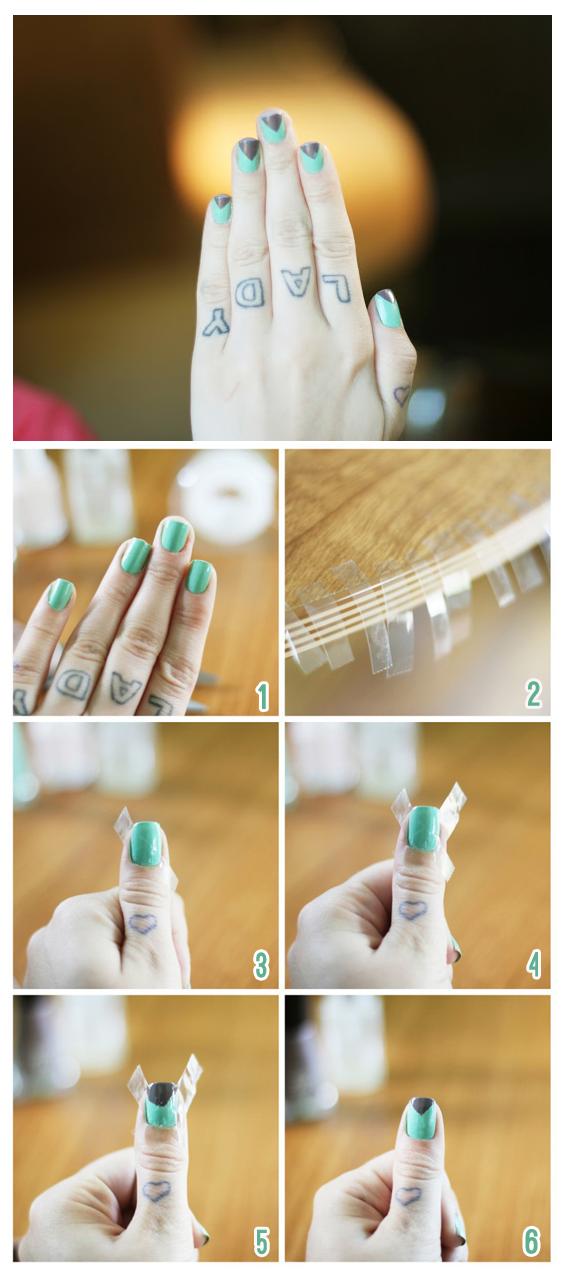
You will need : orange, yellow, white, and silver glitter nail polish, scotch tape and scissors. and your favorite top coat.
How To Style :
- Step 1 : Paint your nails orange and let dry completely.
- Step 2 : Cut small strips of tape and place in the center of your nail.
- Step 3 : Paint below the tape line with yellow nail polish. Paint above the tape line with white nail polish. Paint your statement nail with glitter.
- Step 4 : Then carefully peel off the tape. Apply top coat and enjoy.
Source : TWIST-BRAID HALF-Updo
Tutorials You Should also see :
Steps :
- 1 : Start by painting your nails white.
- 2 : Grab a newspaper Right now, your newspapers are loaded with cute little winter images, like snowflakes and other festive goodness which makes this really easy. then Cut out the images you want.
- 3 : Soak the images you cut in rubbing alcohol.
- 4 : Press the image onto the nails and hold. let the polish dry completely before doing the transfer.
- 5 : And Sea the transfer with a topcoat.
Steps :
- 1 : First, paint your tape and then get some decorative edge scissors.
- 2 : Paint your nails while you wait for your tape to dry.
- 3 : When your tape and your nails are both dry, take your scissors and snip the edge of the tape - and then move your scissors a bit until it makes the design that you want, and again, cut it.
- 4 : Be careful - cutting these can be a bit tricky, you actually want to use the sharpest part of your scissors.
- 5 : Anyway, stick that on to your nail - I find it best when the nail polish is dry but still a bit soft, as it doesn't make much of a protrusion.
- 6 : Snip the excess, top it off with a top coat and then you're done! Easy as pie.
Steps :
- Step 1 : Paint the bottom of your nails with some neon nail polish. Paint it in a rough triangle, but it doesn't need to be perfect.
- Step 2 : Get your black nail polish and paint the sides of your nails black, making sure you're doing it a criss cross way in the middle. Make diagonal stripes first if you like, that makes it even easier. Or make one side black first, and than the other. Try it out a little.
This tutorial So easy, it doesn't even need instructions.
How To Style :
- Step 1 : Make sure your nails are completely clean. If there's any oil or dirt on your nails, the tape will have a hard time sticking properly.
- Step 2 : Place strips of striping tape across your nail and double up a few to make thicker lines. Try to make sure the tape is stuck down all the way to the edges.
- Step 3 : One nail at a time, paint on your colour. Try to choose one that only needs one coat to be opaque.
- Step 4 : While the polish is still wet, peel off the tape in one smooth motion from one side to the other.
- Step 5 : Wait until the polish is completely dry and apply your top coat. I didn't wait long enough and you can see the smudges!
- Step 6 : Use a small paintbrush dipped in acetone to clean up around the edges and there you go!
How to Do :
- Step 1 : First choose your colors. and make sure that you have a thin brushed nail polish for the bowline.
- Step 2 : Then Apply the red and let it dry.
- Step 3 : After that apply the pink on the top of your nails and let it dry.
- Step 4 : First draw a thin black line on the part where the red and pink meet. Then draw the tiny bows on the black line and let dry.
- Step 5 : Seal with a clear coat and Voila!. Bow Nails!
How to do :
Step 1 : Apply two coats of background polish on all 10 nails. Apply your first wing-color choice in the form of a curved line. Apply your second wing-color choice right next to it, and leave a space so you can repeat the curved lines as a mirror image.
Step 2 : Take your striper brush and very lightly pull your brush through both colors, stopping in the middle of the empty space. Repeat this to fill out the wing design, and make sure to angle the lines toward the middle so they meet in the center. The lines should all meet in the center of the empty space you left.
Step 3 : Once your wings are marbleized on all the nails, create the detail for your butterfly by painting the body and outlining the butterfly for a better look.
How To :
- Step 1 : Use your pinking sheers to cut out ten strips of tape. You're going to want the tape to have been cut on both sides so it has zig zags.
- Step 2 : Paint your nails one solid color, and let dry completely.
- Step 3 : When your nails are 110% dry apply the small piece of tape across your nail in the middle so that there are equal areas not covered on the top and the bottom.
- Step 4 : Using which ever color you'd like next paint the bottom portion of your nail. It's easiest to start from the bottom of your nail and paint slowly and steadily up to the tape.
- Step 5 : Now paint the top part of your nail starting from the top of the tape to the tip of your nail.
- Step 6 : As soon as you get done painting take the tape off quickly in one solid pull. If you do it slowly it might pull up some of your newly painted polishes. Now repeat with the rest of your fingers and after that's all dry seal it up with a top coat.
Steps :
- You will Need : Two colors of nail polish that you like together. And a white nail polish with a thin brush.
- 1 : Apply two layers of the yellow.
- 2 : Add the pink by gently brushing it onto your nails in a triangular shape. Be as precise as you can, but don't worry if the edges aren't as sharp as you'd like. Because the white lines will cover that up for you.
- 3 : Apply a thin white line over the line of the pink nail polish. Then, paint a line from the button of your nails until you meet the other white lines. And you're done!
How To Style :
- Step 1 : Take your dotting tool, dip it into the color of your choice and create small little blobs of paint. These will be the base of your flowers.
- Step 2 : Take your striping brush and carefully paint an inside circle of each flower a darker shade. Let dry.
- Step 3 : Dot small black circles in the middle of each flower.
- Step 4 : Add leaves to each flower. Let dry, then complete with a top coat. And you're done!
How To Style :
- Step 1 : Paint your base coat color.
- Step 2 : Add one stripe on the left side of each nail with Neon Red.
- Step 3 : Add another stripe on the right side of each nail with Neon Orange.
- Step 4 : In the middle of your nail, add a Neon Yellow stripe.
- Step 5 : Add a smaller turquoise stripe between the Neon Yellow and Neon Orange stripes. Clean up the mess around your nails with a q-tip or old makeup brush and some nail polish remover.
- Step 6 : Add a shiny top coat. I used Essie's No Chips Ahead.
Steps :
- Step 1 : Paint your nails white as the base coat.
- Step 2 : Take the pencil use the pointer and take a drop of nail polish on it and start putting the dots on your nails
- Step 3 : Keep adding the dots with all the other colors(Try to make the dots in different sizes it looks better)
- Step 4 : That’s it! you have the colorful nails.
How to Do :
- Step 1 : First choose your colors. and make sure that you have a thin brushed nail polish for the bowline.
- Step 2 : Then Apply the red and let it dry.
- Step 3 : After that apply the pink on the top of your nails and let it dry.
- Step 4 : First draw a thin black line on the part where the red and pink meet. Then draw the tiny bows on the black line and let dry.
- Step 5 : Seal with a clear coat and Voila!. Bow Nails!
How To Do :
- Step 1 : start with a coat of Wet ‘N Wild’s Metallica silver polish. and Wait for the polish to completely and thoroughly dry.
- Step 2 : Apply the reinforcement stickers to the base of the nail bed.
- Step 3 : start painting on the second color. Ensure a clean contrasting line of color by painting on top of the sticker and around the edges. Don’t be afraid to get polish on your fingers, that’s easily removable.
- Step 4 : Wait for the second color to completely dry before peeling off the stickers. then Finish with a top coat and voila, easy-to-do half-moon manicures!
You Will Need:
- Two polishes of your choice
- Toothpick
- A plastic surface ( saran wrap or a plastic bag)*
Steps :
Step 1.
Pick your polishes and get a toothpick ready
Step 2.
Spread out saran wrap or a plastic bag over a hard surface. I suggest you duct tape it in place so it doesn't move and ruin your polish while it's drying. Put a dab of the base polish and then a dab of the tip polish on top of it. You should make the whole dab more or less the size of your nails.
Step 3.
Take your toothpick and swirl away!
Step 4.
Well this is the part you need patience for : Let your swirl dry overnight, then using a toothpick or your nail, detach it from your plastic.
Step 5.
Put a base coat on your nail and BEFORE IT DRIES put the swirl on your nail. It will probably not fit perfectly so you can cut and bend it into shape. It also might be too small on the sides but that doesn't matter, it's really easy to fix!
Step 6.
After you've cut and formed your swirl transfer into shape, correct the edges with polish. Like you can see in the picture, the bottom ended up being uncovered, so I just put some extra pink polish where needed.